Pages

Wednesday, December 12, 2012

I'm a winner!

I'm baaaaaaaaaack!
No I didn't die... or join a cult that doesn't allow Internet... or drop off the face of the Earth.  Oh yeah, I might have done that last one.  I am finishing up my last semester of nursing school. I graduate Friday and I couldn't be more excited to get my life back and start spending more time with my friends and family!!!  I just wanted to give a quick shout HELLO! and give you a recipe.  The weekend before last we went to a chili cook-off and guess whose chili won first prize? That's right... yours truly! I even got an awesome trophy that is displayed with pride right next to our wedding pic!
 I meant to take a picture of the chili itself, but it was all gone before I got a chance.  That's a sign of a good dish! So here's the recipe for my Champion Chocolate Chili!

Champion Chocolate Chili
  • 1 lb bacon (diced)
  • 1 lb spicy Italian sausage
  • 1 lb sweet Italian sausage
  • 1 large can (29 oz) tomato sauce
  • 2 cans of Rotel diced tomatoes with green chilies
  • 1 small can of plain diced and peeled tomatoes
  • 1 medium white onion (diced)
  • 1/4 cup (or less) Sweet Baby Ray's Hickory and brown sugar BBQ sauce (or you could add brown sugar and liquid smoke to taste)
  • 1/8-1/4 cup chili powder (depending on the amount of kick you like- I'm a weenie so I used less)
  • 1/2 Tbsp Italian seasoning
  • 2 cans dark kidney beans
  • 2 cans light kidney beans, and finally...
  • 2 one-ounce squares of unsweetened bakers chocolate
  1. In your stockpot combine tomatoes, tomato sauce and Italian seasoning over medium heat.
  2. Cook bacon until crisp.  Then, stir it into the stockpot.
  3. In the same pan, brown the Italian sausage and stir it into the stockpot.
  4. Caramelize the diced onion in the same pan and stir it into the stockpot.
  5. Add BBQ sauce and chili powder to taste.  Adjust as necessary.
  6. Stir in the kidney beans (undrained)
  7. Stir in the chocolate squares.  They take a while to melt so keep stirring.
I made this Thursday night and the cook-off was early Saturday afternoon.  After it was finished I put it in the fridge until Saturday morning.  I took it out, heated it up on the stove again, then transferred it to my crockpot.  I think making it ahead of time really let the flavors come out.  This is a little bit sweeter chili but with the spice it was perfect!  Thanks so much to Ashley and Court for hosting the 7th time! 

Friday, May 11, 2012

Mickey Mouse Clubhouse Birthday continued (lots more pics)

So I just shared a lot of my projects from Olivia's 3rd birthday party here but I have a few more... plus a bunch of party pics.
Here is a pic of my sweet table.  I was very ambitious and thought I would make cake pops, a 3D clubhouse, chocolate covered oreos, Mickey shaped cookies with royal icing as well as the number 3 and square ones with Olivia's name.  This was a bit ambitious for anyone I think but especially for me since I just had a baby 3 weeks before Olivia's birthday. Well, this is what I got instead.  Oreos out of the package, cupcakes, and puppy chow.  I also made chocolate chip cookies and I found these adorable Minnie mouse sugar cookies that really didn't turn out anything like what the box looked like ;) It was still a big hit.
Also big hits were the 18" pixie stix and gourmet lollipops.  I'm not sure what makes them gourmet but they went fast!  The pixie stix were fun because I added little Mickey  labels to the top. The kids were really excited about these but I'm not sure the parents were.  I don't know that I would use them again for a party for toddlers... OOPS!

We had the basic food set up~ Hot dogs, chips and salsa, chex mix, some cheesy stuff.  Here is a pic of Nic preparing the "Hot Diggity Dogs" and look at what I did with the hot dog ketchup, mustard and relish bottles.
We also played some games.  This was an area I had to scrap too.  I had planned on making Minnie's BOW~tique, Goofy's obstacle course, Mickey Pavilion and Pluto's bubble bath.   Then I realized that there was not enough time and I didn't have enough "extra" adults to oversee these games.

So, Minnie's BOW~tique turned into Minnie's BOW~la~rama.  We didn't have an organized obstacle course but I still had tons of hula hoops to jump through and some other fun things.  I didn't get many pics of that but I did get a couple of Donald's Ducks.  You know what else I didn't get many pics of?  The birthday girl! She had such a good time and would not sit still long enough.  I thought I had a good pic with this one but she ran off!
I could hardly get her to come in for cake and presents

This is a pic of her gift table.  I made a banner with her name out of glitter paper using my cricut.  She loved it because it was so sparkly.  I hung it up in her playroom after the party.  I made a big cardboard number 3, painted it pink, modge podged and glittered the hell out of it but I totally forgot to hang it up :( I thought I could let someone else use it but then it got ruined outside.  Oh well.  I had also planned this big Mickey frame using a 10x13 and 2- 5x7 pics cut in circles framed with black glitter paper circles put together like a Mickey Mouse head and maybe even a big bow but it didn't work out. I ran out of time.  So what I do with a picture this size?  
I just hung it over the gift table.  I didn't want it to go to waste. I mean look at this girl... What a cutie, right?! Her sister is pretty cute too!  It was really hot out and she was so new that she was inside for most of the party.  She had some cute Minnie mouse ears too.  I know someone got a picture of her with them on but I'm not sure who. So, if you have it, please send it my way.  Here are some more pics of the party fun!


Thank You!!!


Mickey Mouse Clubhouse Birthday (lots of pics)

I just thought I would share some pics of Olivia's birthday party.  The theme was Mickey Mouse Clubhouse.  I didn't want to have a "grocery store party" but I was limited on time and resources because Penelope was born just a few weeks before Olivia's birthday.  I had to scrap probably half the ideas I had because I just couldn't fit it in.  I'm sure I'm the only one who noticed anything was missing.
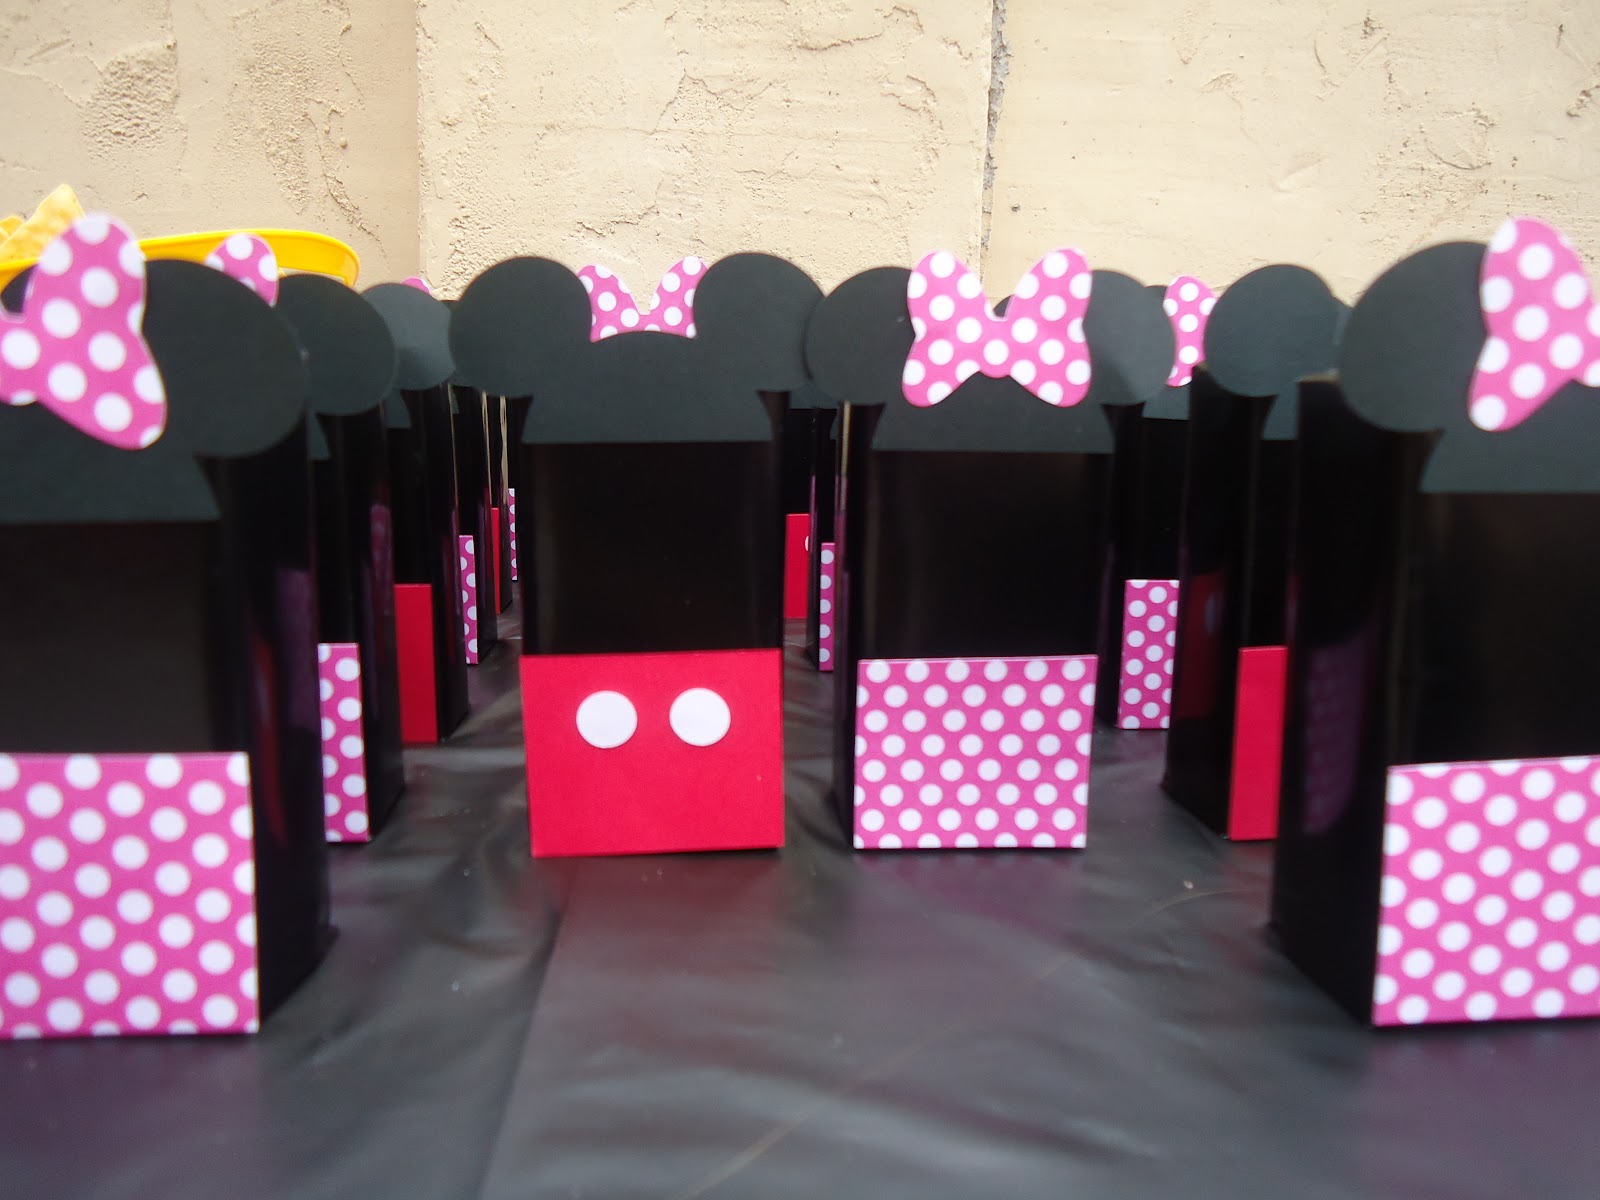
Mickey and Minnie favor bags
So, I started with the Favor bags.  I wish I would have taken a pic of the contents but I didn't think to do that until after they were all gone.  They were a big hit! There was a slimy sticky hand thing, Mickey stickers, bubbles, a party horn and a kaleidoscope.  I didn't put any candy in the bags because we had candy prizes for some of the games.  To make these I used the solid color bags from Hobby Lobby.  There are 10 in a pack for $1.99.  You could also use a 40% off coupon if you wanted but I didn't.  I used my Cricut and the Mickey and Friends cart to cut the head pieces.  The ears were cut at 7 3/4 and the bows were cut at 2 1/2 real dial size.  The bottoms were just 4x6 pieces of paper and the buttons were 1" circles.  I did the same thing with the juice boxes. 
Mickey and Minnie juice boxes
First I wrapped them in black wrapping paper. (love HL's because there is a grid inside) And used 2" mickey heads but that will probably depend on the kind of juice boxes you use.  I used HiC.  I think juice boxes are my new thing.  I love the way they can be decorated to match any theme.  Like these reindeer boxes I made for Olivia to take to school and for a Christmas party last year. I have used different things to reattach the straws but I really think hot glue works the best.  Just make sure you are extra careful peeling the straws off so the wrappers are still intact when you go to reattach them.


I also made a couple banners. I made a basic name banner for the gift table.  In pics you can't tell that I used glitter paper but the birthday girl loves all things sparkly!  Now it is hanging in her playroom.  The one I was really excited about was the Happy Birthday banner.  It was so much fun!  I used gears in primary colors.  They are actually tractor wheels but there is a very similar image in the shapes file of SCAL.  I used the Mickey Font cart for the letters but you can download this from dafont.  I think it's called Minnie.  The hands were cut from Mickey and friends.  I attached them with little red brads.  I normally use ribbon but that didn't seem to work for the gears.  This way they kind of look like they are moving together.

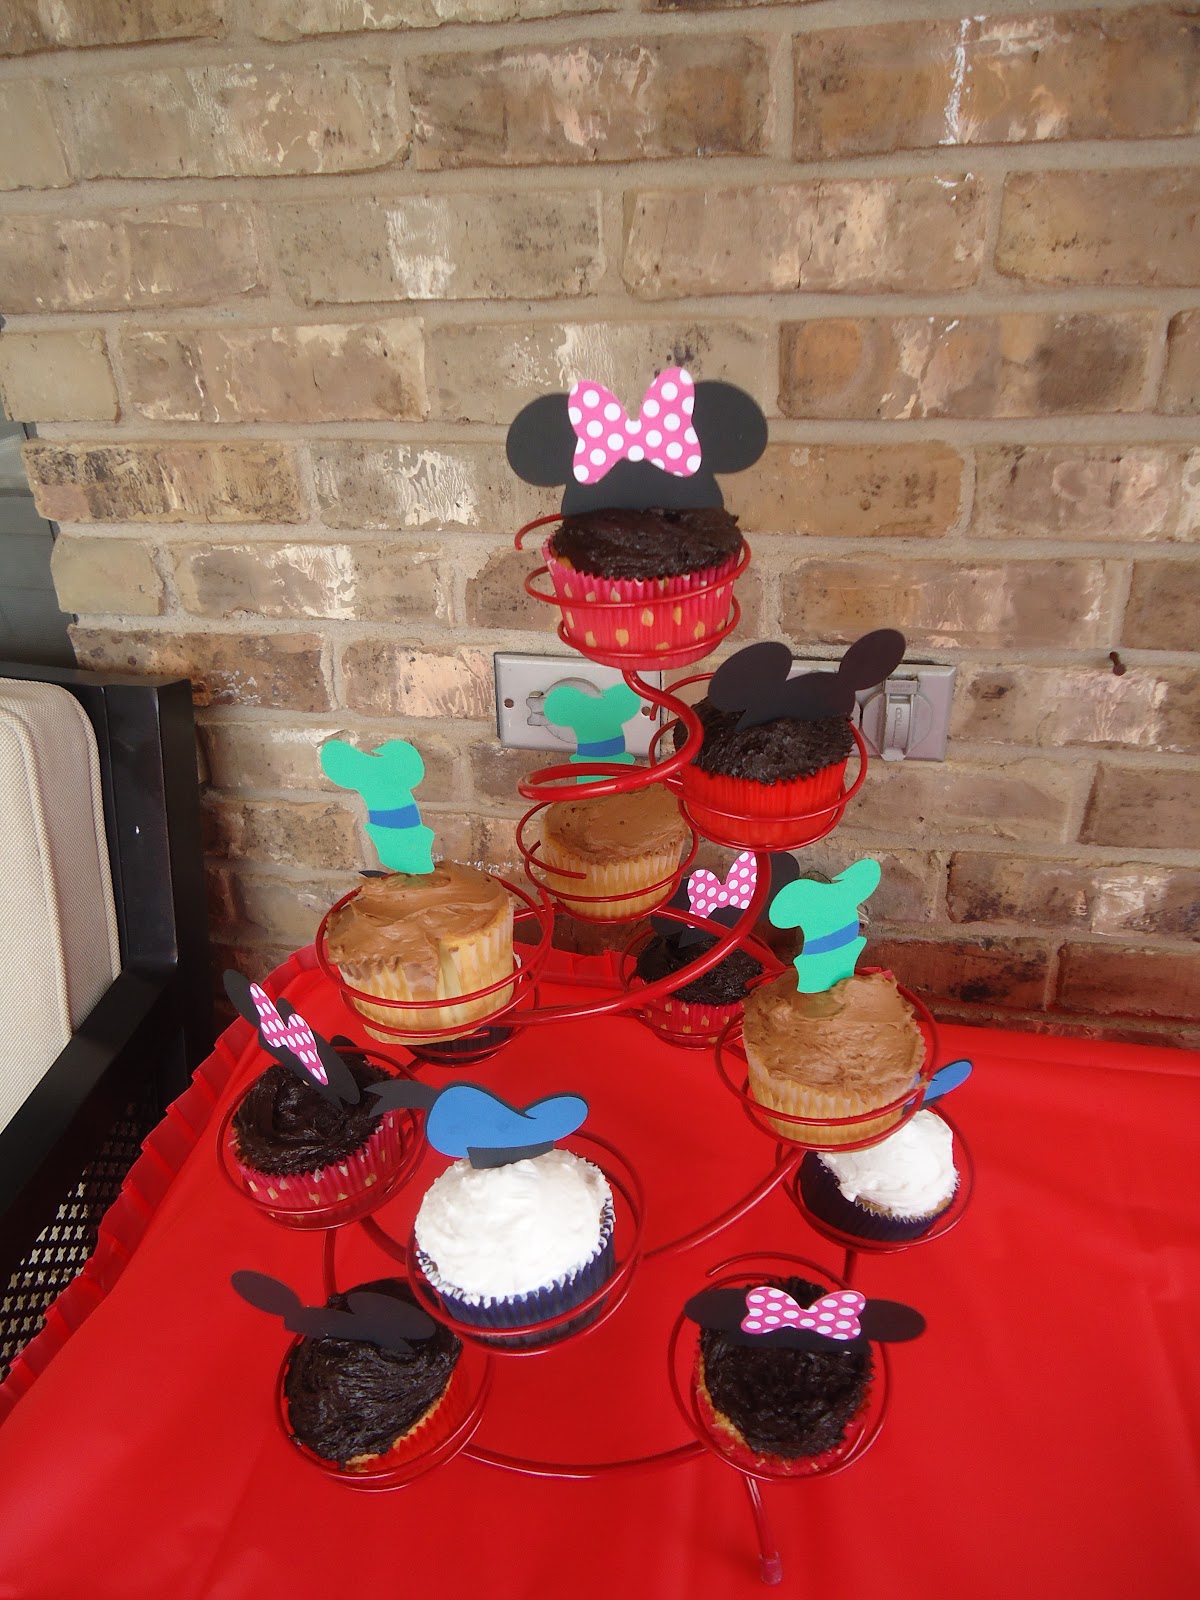
I was pressed for time so I ditched the 3D fondant covered clubhouse and went for cupcakes.  Actually, Nic made all the cupcakes and I made the icing and cupcake toppers.  The cupcakes were all vanilla (so the cupcake liners would not turn too dark as they often do with darker batters)  This was a fun way to incorporate some of the characters from the show.  I used red liners for Mickey and pink polka dots for Minnie, added my fudge cream cheese icing and little ears on a pick.  For Donald I just cut out his hat and a tiny red bow, which I don't think I got a pic of, and used buttercream icing.  For Goofy I used a yellow liner, chocolate buttercream and his hat on a pick.
I have a some other projects I did and a whole bunch of pics to share so I'll just post them here

Sunday, February 19, 2012

Very Hungry Caterpillar cake

This is a cake I made for a friend last month. I actually pinned it with no one specific in mind.  I already have a theme for Olivia's party this year but I just thought it was super cute!  Anyway, a friend of mine saw the cake and asked if I could make it.  At first I was really intimidated but I decided to give it a try.  It ended up being one of my most fun cakes and I'm sure I'll end up doing it again.  It's far too early to start planning birthdays for next year but I have a feeling the Very Hungry Caterpillar will be a top contender. 
I just used the image from the book's cover as a guide and cut a shape out of parchment paper that looked like the caterpillar.  I made the head seperately so it could also be used as the smash cake.   Since it is covered in fondant I think it might be hard for a baby to dig into.  For the body I marbled different shades of green fondant by using green (of course) black, blue, yellow and white colored fondant.  I even used a little green luster dust on a few of the pieces.  I didn't want to go crazy with the shimmer because it was for a little boy but for a girl I might glitter it all up ;)
The head is covered in red fondant and the eyes were just cut free-hand.  The legs, antenna and lining look really dark but it is actualy chocolate fondant.  I think it tastes pretty good... especially compared to the regular fondant.  The dots were cut out using the bottom end of a wilton icing tip and the board is covered in white fondant.  This cake took SO much fondant.  I usually decorate cakes with buttercream and add fondant accents so this was a little different for me.  Overall, I am really happy with the way it turned out and my friend seemed really pleased too. This last pic was taken when I had just finished it before I put it into the cake box.  I added a little cupcake for the birthday boy but this pic just has an empty cupcake liner.  So what do you think? Is the Very Hungry Caterpillar a good theme for a party or what?

***update: I didn't add any links in this post.  I'm working on how to remove them but the links you see are ads so don't click on them.


Saturday, February 18, 2012

Cupcake Social

This is a little late (as I often am) but I was so thrilled to have a cupcake social a while back.  It was so much fun and I would love to do it again and again for my mommy group, birthday parties or just because.  We put a new spin on an old-fashioned ice cream social... with cupcakes!  First, I saw plastic artist palettes like this and thought "wouldn't that be cute with a ton of different sprinkles?"  They were about $2 each and I just felt like that was too much for maybe 20 kids for something I thought was going to be disposable.  Then I found these and they were perfectly priced (especially with a 50% off coupon).  I hoard stockpile collect sprinkles so I'm sure I already had enough but I couldn't resist the urge to get 3 different varieties of hearts since this was before Valentine's Day.  On a sidenote, I get my sprinkles all over- craft stores, grocery stores, online, but my favorite place is called Midwest Bakers Supply.  They are a local store and do not sell online :(  They have the basics but they also have a lot of things you can't find in stores and they are priced really well.  I don't shop exclusively local but I do like to shop local when I can.  They have every possible thing you could need for baking so if you're ever in need I recommend this little shop. 
Anyway, the palettes have 10 little holes or wells and I put different sprinkles in each well using a little baby spoon.  As it turns out, I really overdid it on the sprinkles bc I had TONS left over.  I also put buttercream icing into little disposable cups with lids so that there would be no double-dipping  (I did this ahead of time so it would be easier to set up)  The kids just used popsicle sticks to spread the icing onto the cupcakes. I got these tiny little spoons from Olivia's GiGi for them to put the sprinkles on top.  They look a lot like the spoons you would get at an ice cream shop for samples.  I have seen metal ones at bed bath and beyond.  I thought I saw the mini plastic spoons at party galaxy but I didn't find them on their website.
The kids had a blast decorating their very own cupcakes!  Most of them even ate the cupcake! My daughter, however, still just ate the icing and sprinkles.  I thought this was so much fun! I loved to see all the different ways the kids decorated their cupcakes given all the same supplies.  How fun would this be for a birthday party?! And just think how easy it would be! It would save SO much time and effort that you could put towards the decor or favors or some other part of the party.  Plus it could be used as entertainment too.  I wish I would have thought of this earlier.  If I didn't already have Olivia's party in the works I would totally do this.  So, does this look like fun to you? Let me know what you think!

Friday, February 17, 2012

The girls' room


I thought I had it all figured out. Olivia received the cutest bedding from PBK after she was born. It was a total surprise bc we thought we were having a boy and had jungle bedding.  Anyway, a good family friend got this and I just LOVE it! It's pink and gray and just perfect really.  I just thought I would let Penelope have Olivia's old bedding and get Olivia something new to coordinate.  The only problem is there is nothing in pink and gray.  That's ok.  I can make it ;) There really aren't any fabrics in both pink and gray. So, I decided that I would just use this great gray damask print and pair it with some pink prints and solids. I just never found anything I liked well enough.   So, here we are just about 6 weeks away from Penelope's arrival and I have absolutely nothing done!
This fabric kept catching my eye but it didn't match anything else I was planning in my mind.  It's hard to tell on this pic but it is gray, lavender (or wisteria) and yellow.  After searching and searching and (watching that fabric go out of stock while I waited) I decided to change my plans, found this fabric at a fabric wholesaler along with all the coordinating fabrics as well.  I can't wait to get started! My first project? Cornice boards for the girls' room.  It will be in this fabric to the left.  After I get those up I will decide on how to use the other prints.  I just love it, don't you?!

Tuesday, February 14, 2012

Valentine's Day Projects ~ I Love Your Guts!

These are a few of the projects I did for Valentine's Day. I wish I would have done them a little earlier because I stayed up way too late last night. I couldn't be happier though. Sometimes I wonder why I put myself through the heartache of painstakingly hand making every little thing.  Maybe it's because I have such crafty friends who are so talented and I feel  like I need to keep up but lately I blame pinterest! I see all these great ideas and think "I can totally do that" and I can... I just don't have time to do it all.  I bet if I spent a little less time pinning and a little more time actually crafting I would get more done :) but when it's all said and done I am always really glad when I see the end results.
I'll start with these adorable valentines I made for Olivia's class. (I think they would also make cute invites for a monkey themed shower or birthday party) I got the idea from pinterest of course. It was from the fiskars website. It has great directions so i won't write them here but it used 5 different cutters that they sell. I didn't have any of those cutters so I just played around with sizes on my cricut until I got this.
2 1/2'" circle
2" heart
2 1/4" oval
1" circle
Instead of using the 1/8" hole punch for eyes I used googly eyes. I just love me some googly eyes! I put everything together with a glue stick and glue dots. I printed out tags for the back using trace letters so she could write her name herself. She was so proud of herself and so was I. She's only 2, so to me this is pretty impressive. She loves to "write" and draw so much so I just printed a tracing sheet for her with her name. She loves to do it so I printed more. I think I will laminate a couple sheets and let her have at it with dry erase markers.
I also made this little gift for her teacher. It's hanitizer! That's what Olivia calls hand sanitizer. I just removed all the labels and used some goo remover stuff to get the rest of the sticky stuff off. I used my cricut to make this too. I know it took me a year to take my cricut out of the box but now that I have really started using it I LOVE it so much! My friend Keli has a program called Sure Cuts A Lot that allows you to use files from your computer on your cricut. It basically does a lot of the same things cricut craft room does but with that program you still have to have all the cartridges. SCAL can use any font you have in word or download from sites like dafont.com. I can also download tons of images or make my own (which I haven't tried yet). It saves a ton of money on cartridges.

And finally, my favorite project is the card I made for Nic. When we first started dating I would say "I love your guts!" I said it to my friends too, sort of the opposite of I hate your guts, right? Anyway, in the beginning (before I could admit I actually loved all of him) I would just say this. I have said this for years but I never thought to make it into a card... until pinterest. I don't know how to embroider but when I saw this pic I just knew I HAD to make this for him. I did make some changes but I'm not sure if they were actually improvements or not. He loved it though. He actually laughed out loud, gave me a big hug and kiss and said it was "perfect". It's kind of an inside joke now so he's probably the only one who would enjoy this kind of card. I also made him an etched beer mug but I think I'll write about that later since this post is already so long.